


 LinkBack URL
 About LinkBacks


 Reply With Quote
Is there a way to get CS4 to use variable length LNZ compression for PNGs? |
|
Results 1 to 25 of 31
Thread: Ask Me about Photoshop!
-
03-12-2010 03:34 AM #1Member


- Join Date
- Mar 2010
- Gender

- Location
- Portland, OR
- Posts
- 29
- Likes
- 4
Ask Me about Photoshop!
I'm a self-professed Photoshop guru! I've been using it for 17 years, and I feel confident that I can answer any questions you might have!
Also, I love to help!
So go on, shoot!
What happens next is the product of what is happening now, and how you choose to react.
z(n+1) = z(n)^2 + c
~The Mandelbrot Set
-
03-15-2010 01:11 AM #2Banned
- Join Date
- Apr 2007
- Location
- Out Chasing Rabbits
- Posts
- 15,193
- Likes
- 935
-
03-16-2010 04:09 AM #3Member
- Join Date
- Mar 2010
- Gender
- Location
- Portland, OR
- Posts
- 29
- Likes
- 4
Yes, with a plugin: http://www.fnordware.com/superpng/
There might be a way to get CS4 to do it without the plugin... but I haven't found it! Hope that works for you!
What happens next is the product of what is happening now, and how you choose to react.
z(n+1) = z(n)^2 + c
~The Mandelbrot Set
-
03-16-2010 05:10 AM #4
How'd you become a PS guru?
-
03-16-2010 05:13 AM #5Gentlemen. Ladies.

- Join Date
- Mar 2007
- Gender

- Location
- Right here... Reputation: 9999
- Posts
- 4,902
- Likes
- 473
- DJ Entries
- 4
I've been using photoshop for a few years now and I'm also self taught. I wouldn't say I'm a guru, but using photoshop is pretty easy.
-
03-16-2010 05:49 AM #6
I use it very rarely. Past two years or so. I suck very badly.
-
03-16-2010 06:39 AM #7Member
- Join Date
- Mar 2010
- Gender
- Location
- Portland, OR
- Posts
- 29
- Likes
- 4
My mom taught a Photoshop class at the local community college when I was 9, I went along to her classes and have been playing and learning more ever since. More recently, I went to college for photography and found that I had more interest in Photoshop than in the studio. Originally Posted by Xox

What happens next is the product of what is happening now, and how you choose to react.
z(n+1) = z(n)^2 + c
~The Mandelbrot Set
-
03-20-2010 10:01 AM #8Fan of "That Guy"

- Join Date
- Mar 2007
- Gender

- Location
- California, USA
- Posts
- 1,105
- Likes
- 29
What'd be helpful would be to compare aspects of Photoshop with the program I'm stuck with, Paint Shop Pro...if you know anything at all about the latter, that is. It seems whenever I seek out a coloring/shading/effects/etc. tutorial, Photoshop is the only thing digital artists use. I have no idea how to replicate what is shown in their tutorials because PSP operates completely differently...or so it seems.
Final Fantasy VI Rules!

Total LDs: 10 | WILDs: 4 | DILDs: 5 | DEILDs: 2
"Take atheism, for example. Not a religion? Their pseudo-dogmatic will to convert others to their system of beliefs is eerily reminiscent of the very behavior they criticize in the religious."
-
03-20-2010 11:10 AM #9
Paint Shop Pro is horrible.
I've been using Photoshop myself for a long time, but I'm sure there are things I don't know. I'll keep this thread in mind if there's something I can't figure out

---------
Lost count of how many lucid dreams I've had
---------
-
03-22-2010 10:54 PM #10Light Rail Transit
- Join Date
- Dec 2009
- LD Count
- 17
- Gender
- Location
- Toronto
- Posts
- 299
- Likes
- 34
- DJ Entries
- 2
If and how is Photoshop better than Paint.NET?
-
03-23-2010 06:50 AM #11Member
- Join Date
- Mar 2010
- Gender
- Location
- Portland, OR
- Posts
- 29
- Likes
- 4
Lëzen - I don't know of any way to compare Photoshop to Paintshop Pro. I recommend targeting your search keyphrases to include "Paintshop Pro" (in quotes) or -photoshop.
LRT - I wouldn't know, I use a Mac.
Last edited by Serentripity; 03-23-2010 at 06:56 AM.
What happens next is the product of what is happening now, and how you choose to react.
z(n+1) = z(n)^2 + c
~The Mandelbrot Set
-
03-23-2010 09:10 AM #12Veteran of the DV Wars


- Join Date
- Mar 2007
- LD Count
- ~35
- Gender
- Location
- Houston, TX
- Posts
- 4,553
- Likes
- 94
Tell me about subtlety of lighting in pixel elements. One-pixel highlights, carefully colored shadows, sure, but any other tips?
-
03-23-2010 06:37 PM #13Member
- Join Date
- Mar 2010
- Gender
- Location
- Portland, OR
- Posts
- 29
- Likes
- 4
That's a pretty vague question. What are you trying to achieve? Originally Posted by Man of Steel
What happens next is the product of what is happening now, and how you choose to react.
z(n+1) = z(n)^2 + c
~The Mandelbrot Set
-
03-23-2010 09:43 PM #14Veteran of the DV Wars
- Join Date
- Mar 2007
- LD Count
- ~35
- Gender
- Location
- Houston, TX
- Posts
- 4,553
- Likes
- 94
Realistic lighting in three-dimensional web design elements, in short.
-
03-25-2010 12:20 AM #15Be a man of Value.

- Join Date
- May 2008
- Gender
- Location
- Pico Rivera
- Posts
- 529
- Likes
- 22
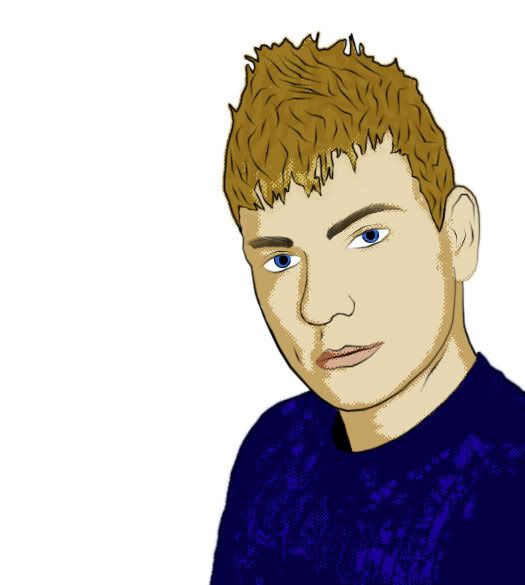
How would you go about turning a regular picture *See Below*

Into a high quality cartoon pic as shown? *See Below*
-
03-25-2010 11:56 PM #16Member
- Join Date
- Mar 2010
- Gender
- Location
- Portland, OR
- Posts
- 29
- Likes
- 4
I would open the image in Photoshop and create a new layer, then on this new layer, use the pen tool to trace the outlines that you want to keep. Once you're happy with your outlines, stroke them by right clicking the path with the pen tool and selecting "stroke path>brush", or hovering over the path with your brush of choice and hitting "enter". Note: It can be helpful to stroke one path at a time and delete them as you go - this will allow you to select a different stroke for each line (the stroke is equivalent to the brush settings you have selected), and will keep your work area less cluttered. Originally Posted by Jorge
I would then create various layers beneath the outline layer, one for each color - keeping the colors on different layers makes them way easier to change at any point. It is helpful to group all of your color layers together.
Sometimes this effect can be achieved well enough by duplicating your original image layer, removing the background, and applying filter>artistic>cutout, or image>adjustments>posterize (the filter settings will vary depending on image size, color depth, and resolution - play around with them to find what looks best), and keeping the outline layer on top... but I find more often than not it looks better to just suck it up and take your time doing it by hand.
If you have any further questions or would like more detailed instructions on any step, let me know!
Important: I would finish up by NOT posting a link to "cartoonify yourself" on my thread. Apologies if this wasn't your intention - shame on you if it was!
What happens next is the product of what is happening now, and how you choose to react.
z(n+1) = z(n)^2 + c
~The Mandelbrot Set
-
03-26-2010 12:12 AM #17Member
- Join Date
- Mar 2010
- Gender
- Location
- Portland, OR
- Posts
- 29
- Likes
- 4
When I design for web, I almost always use various combinations of layer styles to achieve cohesive, easy-to-duplicate lighting and 3d effects - but not knowing how you're constructing your elements or what look you're going for, I'm really not sure what information would be most helpful to you! Originally Posted by Man of Steel
Details would really be helpful - images even more so! If you don't want to post your web-design images on the thread, I understand - PM me and we can find a way to work around it
What happens next is the product of what is happening now, and how you choose to react.
z(n+1) = z(n)^2 + c
~The Mandelbrot Set
-
03-31-2010 07:08 AM #18Be a man of Value.
- Join Date
- May 2008
- Gender
- Location
- Pico Rivera
- Posts
- 529
- Likes
- 22
Thanks buddy!
Also, how would I make a custom shaped banner like shown below?

See how it bends towards the right? How would I make an image like that in photoshop? I've made banners, but they've been square or rounded square. Not sure how to make custom shapes like that.
Sorry to bug. =/
-
03-31-2010 08:56 PM #19Member
- Join Date
- Mar 2010
- Gender
- Location
- Portland, OR
- Posts
- 29
- Likes
- 4
It's all about the pen tool!
If you've never used the pen tool before, it can be a little tricky - but as you get used to it you'll find that it is one of the most useful tools in Photoshop and wonder how you got along without it! How the pen tool works is basically like a fancy game of connect-the-dots.
The elements of the pen tool you'll need to know are anchor points, drag handles, and the path itself. When you click once with the pen tool, it creates an anchor point, clicking somewhere else will create a path between these anchor points. This is all well and good if you are creating a shape with only angled corners, but if you want your line to curve, as the example shape does, you will have to click and drag in the direction you want it to curve. This takes some getting used to, but is actually a bit more intuitive than it seems. The direction you drag the drag point determines the direction of the curve, and the distance you drag the drag handle from the anchor point determines the size of the curve. If your curve is out of control, you can move your drag handles by holding the command key (this changes the pen tool to the direct selection tool - you can also change directly to the direct selection tool by hitting A).
To close your path, i.e. make it a closed shape rather than just a line, follow the shape you are making until you get back to your original anchor point and click it - when you hover over it your cursor should show a little circle.
I recommend playing around with the pen tool for a while to get used to it, and then opening the image you posted, creating a new layer, and then tracing the shape you want. Remember that the bottom of the image is part of the shape too, so trace the curved line from one side to the other and then click on each of the bottom corners of the image, and then back to your starting point to complete the shape.
Now that you've got a closed path, you can right click (control+click on a Mac) the path and it gives you options to fill path, stroke path, etc. Once you have filled / stroked the path and are happy with the results, you can right click it again and select "delete path" to get it out of your way.
A few crazy tips:
If you have a line that curves and then has a sharp corner, you can hold the "alt" key to temporarily turn the pen tool into the "convert anchor point" tool, to move only ONE of the drag handles.
Once you've selected an anchor point or drag handle with the direct selection tool, you can nudge it with your arrow keys.
Selecting "stroke path" from the right click menu will bring up an option box - chances are you'll want to use the brush to stroke your path. It will use your current brush settings to do this, so make sure you have the size, shape, and hardness of your brush set where you want them. You can also stroke a path by hovering over it with the brush tool and hitting enter.
And finally, if you're trying to attract the ladies, they can tell that this is your intention and will be creeped out. Don't try to become a player, just be yourself!!!!!
What happens next is the product of what is happening now, and how you choose to react.
z(n+1) = z(n)^2 + c
~The Mandelbrot Set
-
03-31-2010 09:09 PM #20Be a man of Value.
- Join Date
- May 2008
- Gender
- Location
- Pico Rivera
- Posts
- 529
- Likes
- 22
Thank you!!!! You've helped me a lot, I've never used the pen tool, but I have a ton of tutorial videos and one is title "Master the Pen Tool" so yes! Originally Posted by Serentripity

Oh and as for the "player" thing, I just like the banner is all promise! Thank you again!
-
03-31-2010 11:17 PM #21Member
- Join Date
- Mar 2010
- Gender
- Location
- Portland, OR
- Posts
- 29
- Likes
- 4
Best of luck on your creation - I'd love to see the finished product!
What happens next is the product of what is happening now, and how you choose to react.
z(n+1) = z(n)^2 + c
~The Mandelbrot Set
-
04-02-2010 03:53 AM #22Be a man of Value.
- Join Date
- May 2008
- Gender
- Location
- Pico Rivera
- Posts
- 529
- Likes
- 22
Originally Posted by Serentripity
Hey Serentripity! I made my cartoon image avatar! I didn't do it the complicated way, I used a filter (Poster Edges) and tweaked with them. I first extracted my body from the original image, then I applied the filter. I then got a soft brush and hit "ALT" to get my skin color and make it more smooth.
It's pretty decent eh?
-
04-02-2010 04:45 AM #23Gentlemen. Ladies.
- Join Date
- Mar 2007
- Gender
- Location
- Right here... Reputation: 9999
- Posts
- 4,902
- Likes
- 473
- DJ Entries
- 4
The pen tool is a very powerful tool. A lot of my friends are scared to use it though.
-
04-02-2010 06:00 AM #24Be a man of Value.
- Join Date
- May 2008
- Gender
- Location
- Pico Rivera
- Posts
- 529
- Likes
- 22
Originally Posted by slayer
scared?? I have completely given up on the human race...
-
04-02-2010 08:56 PM #25Member
- Join Date
- Mar 2010
- Gender
- Location
- Portland, OR
- Posts
- 29
- Likes
- 4
I dig it, man! Well done! :bravo: Originally Posted by Jorge
What happens next is the product of what is happening now, and how you choose to react.
z(n+1) = z(n)^2 + c
~The Mandelbrot Set


 Posting Permissions
- You may not post new threads
- You may not post replies
- You may not post attachments
- You may not edit your posts
Bookmarks