


 165Likes
 LinkBack URL
 About LinkBacks


 Reply With Quote
|
|
Results 76 to 100 of 118
Thread: Darkmatters' Art Gallery
-
09-08-2013 04:05 AM #76Diamonds And Rust Achievements:


- Join Date
- Dec 2009
- Gender

- Location
- Center of the universe
- Posts
- 6,949
- Likes
- 5848
- DJ Entries
- 172
^ No. No, I couldn't..

Meanwhile, the Mouser takes form:

Man, it's great practice working on these little background figures! You don't have all the detail to do, so you just concentrate on form. I'm getting used to working with larger brushes and carefully selected values to define the planes, rather than drawing lines and then just 'filling in'.
-
09-12-2013 02:40 PM #77Diamonds And Rust Achievements:
- Join Date
- Dec 2009
- Gender
- Location
- Center of the universe
- Posts
- 6,949
- Likes
- 5848
- DJ Entries
- 172
Enter the mini-dragon
-
09-12-2013 08:22 PM #78Drivel's Advocate

- Join Date
- May 2007
- LD Count
- WhoIsJohnGalt?
- Gender
- Location
- Denver, CO Catchphrase: BullCockie!
- Posts
- 5,589
- Likes
- 930
- DJ Entries
- 9
I think the contrast of the fish is a major plus to the over all image. If you are going to replace it, you should replace it with something that similarly doesn't seem to fit. Its brightness is a big part of why I think it works so well.
Art
The ability to happily respond to any adversity is the divine.
Dream Journal Shaman Apprentice Chronicles
-
09-12-2013 11:18 PM #79Diamonds And Rust Achievements:
- Join Date
- Dec 2009
- Gender
- Location
- Center of the universe
- Posts
- 6,949
- Likes
- 5848
- DJ Entries
- 172
Agreed - the brightness and active shape is necessary to activate that otherwise very dark and oppressive area. I think the head needs to stretch forward a bit more and cross the border into the grey mountain/hill shape, so it isn't totally contained in the dark area. That was one of the problems with the original fish (or rather the red fish, which was like the 4th one I tried) - it remained completely isolated in that dark stream bank so it didn't seem to relate well to the rest of the image.
-
09-13-2013 02:00 AM #80Diamonds And Rust Achievements:
- Join Date
- Dec 2009
- Gender
- Location
- Center of the universe
- Posts
- 6,949
- Likes
- 5848
- DJ Entries
- 172
Scarlet

Wow, I didn't even realize the creature's shape was completely mimicking the s-curve of grass the Mouser is on. Bizarre - guess I did that subconsciously. The pose has changed, and now he's mimicking Mouser's stance. And yeah, flaming scarlet is definitely his color. Lol, I love that he's not even impaled now, it looks like he jumped up on Faf's spear and started lecturing him! He was SUPPOSED to be snapping and clawing at him, but the image has spoken (and so has the mini-dragon guy). The only fantasy element in an otherwise very naturalistic painting. I need to work a little more red into the painting elsewhere now.Last edited by Darkmatters; 09-13-2013 at 02:03 AM.
-
09-16-2013 03:45 AM #81Drivel's Advocate
- Join Date
- May 2007
- LD Count
- WhoIsJohnGalt?
- Gender
- Location
- Denver, CO Catchphrase: BullCockie!
- Posts
- 5,589
- Likes
- 930
- DJ Entries
- 9
little bit of red sunset over the mountains.
Art
The ability to happily respond to any adversity is the divine.
Dream Journal Shaman Apprentice Chronicles
-
09-17-2013 04:42 AM #82Diamonds And Rust Achievements:
- Join Date
- Dec 2009
- Gender
- Location
- Center of the universe
- Posts
- 6,949
- Likes
- 5848
- DJ Entries
- 172
Nice suggestion, thanks! Got something a little different going. I probably won't update until it's finished, which should be soon (I'm determined to finish it this month, after to the best of my calculations about 6 months of work).
Last edited by Darkmatters; 09-17-2013 at 04:53 AM.
-
09-17-2013 04:52 AM #83Diamonds And Rust Achievements:
- Join Date
- Dec 2009
- Gender
- Location
- Center of the universe
- Posts
- 6,949
- Likes
- 5848
- DJ Entries
- 172
Art self-education
I just want to drop this here to help anybody who might benefit from it - this is a brief guide to what you need to learn if you want to be able to draw/paint figures entirely from the imagination or be able to modify your reference freely as you go.
My interest is in classical art, which simply means realistic. There are 2 distinctly different classical traditions - one sometimes called the Atelier system which teaches you to copy exactly what you see before you - essentially making the artist a camera and therefore a slave to the model or reference. The other (I'm not aware of any name for it) teaches you how to render form believably in terms of light and shadow, and also teaches you the forms of the human body (the standard and measure of all classical art). In other words it gives you the power to invent the figure entirely from imagination.
Obviously it's the second one I'm interested in. This is the way comic book artists draw, and many illustrators paint. It's the method Frazetta used, and that's all I need to know! He worked without models (he did occasionally snap photos of himself or his wife, but did not need reference and was ale to freely make changes as he saw fit).
Ok, straight to it then - as I said, there are only 2 simple things you need to learn (simple, but not easy):
1) How to render form realistically in terms of light and shadow
2) The forms of the human body and how they relate to each other
For the first, rendering form realistically in terms of light and shadow, it's very straightforward. Look up web pages for terms like 'form drawing exercise' or 'core shadow exercise'. Yes, it's the familiar old cubes, spheres and pyramids - you've seen them dozens of times already. But you might not fully understand the importance of the exercises. I'll do a few followup posts to explain things like this in greater detail - but I just want this post to be simple and to the point.
For learning the forms of the body I'm talking about a very specific type of understanding - not simply learning the names and placement of all the muscles and bones. That's just anatomy, or part of it. Actually to be artistic anatomy it requires an understanding of the actual 3-dimensional shapes of the various parts and how they relate to each other spatially, which doesn't come from a standard atlas of anatomy (those only serve as a reference or map of the parts of the body - but you should definitely have a good anatomical atlas in your library if not also an ecorche figure standing on your shelf). Besides anatomy it's also necessary to learn figure drawing principles, which deals not with the individual parts but with the overall form and gesture of the body, and especially with techniques for conceptualizing it. Conceptualizing is the most important part - it's what Robert Beverly Hale is referring to when he says 'A drawing is an idea with lines around it'. Getting better at drawing isn't about making prettier lines, it's about improving the sets of ideas underlying those lines.
Here are the books I've personally found to be essential in this pursuit:
• How to Draw Comics the Marvel Way
A perfect starting point. Get this one, whether you intend to go farther or not. It gives you pretty much the whole approach in a nutshell - but the other books fill in your knowledge much more thoroughly - this one is really only an overview, albeit a great one. It's a classic for a reason people.
from Burne Hogarth's Dynamic series:
• Dynamic Figure Drawing
• Dynamic Anatomy
• Dynamic Light and Shade
from Robert Beverly Hale's Master series:
• Drawing Lessons from the Great Masters
• Anatomy Lessons from the Great Masters
• Master Class in Figure Drawing
I've got a lot of books on anatomy and figure drawing, and these do something most of them don't - they present as I said a unified system that allows you to draw and paint realistically without needing a model or reference. This system has been taught to art students from the Renaissance on - up until sometime in the mid to late 20th century when art education in most schools switched to "just draw what you feeeel".
I should mention right up front - these books, aside from How to Draw Comics the Marvel Way, are advanced material meant for the serious art student who already has some understanding of figure drawing at a basic level, and intends to go all the way. This stuff isn't for the casual doodler.
Ok, stay tuned folks - followup posts to come.
-
09-17-2013 11:23 AM #84Diamonds And Rust Achievements:
- Join Date
- Dec 2009
- Gender
- Location
- Center of the universe
- Posts
- 6,949
- Likes
- 5848
- DJ Entries
- 172
How to render basic forms properly in terms of light and shadow
This is the easiest part, but it will still take some time to learn to do really well. I used to groan when I'd see these - I mean come on - this is simple stuff, right? We all know how to do it. Right? Well, if you really do then you're well on your way already. But most art students actually don't know it nearly as well as they assume they do.
Here's one of the tricky things about learning art - it's like learning a language. What I mean is, first you learn to understand it, and at that point many students think they're done - but the real work is learning to speak it, and to speak it fluently. Have you ever heard a foreigner stumbling through your native language and struggling to make any sense using the wrong words and terrible pronunciation? That's what it's like when beginning artists try to render form.
Students think that just because they've seen the basic form shading exercises many times and read about how it's done that they already know how to do it. They're usually wrong. Understanding how to do it is only the first step - You don't actually know it until you can draw it - and draw it well. You should do these exercises every so often to gauge your progress. When your drawings look like this you're getting it:

Here are some decent online tutorials:
Direct Light | Stan Prokopenko's Blog
Drawing Lesson - A Theory of Light and Shade
Starting to Draw: Light and Shadow
Start off by copying exercises you find online. But the goal is to eventually be able to draw it entirely from the imagination and be able to place the light source anywhere. The cast shadows are important too - they help to define where the forms are in relation to each other and to the environment. A cast shadow grounds an object solidly.
An important concept you'll encounter when doing these is the core shadow - the core of a shadow, or the darkest part of the shadow, which lies between the lighted plane and a dark plane. You can really see it here in Tintoretto's drawing:

This perfectly illustrates the real importance of learning to light basic forms - when you understand it then you can light more complex forms and make them look solid and real. If you look back at the latest version of my painting you can clearly see I'm using these principles (after struggling for a good long time.. ). There are a few other things he's doing here that I'll be discussing in the next followup too, that help to make the drawing clearly understandable. And after a couple more posts you'll really see how all this stuff ties together into an amazing system.
-
09-18-2013 12:50 AM #85Diamonds And Rust Achievements:
- Join Date
- Dec 2009
- Gender
- Location
- Center of the universe
- Posts
- 6,949
- Likes
- 5848
- DJ Entries
- 172
Big and simple
No, I'm not talking about a person - I'm talking about shadows - or more properly the shapes of shadows. Beginners often fill their figures with lots of little disconnected patches of shadow, all pretty much the same value (relative darkness level). They do this because that's what they see on the model or in the reference. Skilled artists see it differently, or if they do see little confusing patches of shadow then they fix it. Note - let me state right here that when I say things like this, I group myself among students - somewhat intermediate level, and not at all a highly skilled artist! Though hopefully well on my way. So please, when I talk about beginners and skilled artists, don't take it as if I place myself above anybody here! We're all students, and I present this as valuable and hard-won information that has helped me immensely and I believe it will help anyone else in the same situation.
The difference between skilled artists and beginners is training. Artists are trained to see in terms of form and to use the elements of drawing to maximize the sense of form. This training consists of various strategies that emphasize form and the depiction of it.
A strategy is what helps you win a game or a war, or organize your time well. Good strategizing makes all the difference - it's a plan of action, a way to organize your efforts and unify them. Without good strategy you're lost, just wandering around aimlessly and often one thing you try actually works against others resulting in poor performance. Look back at the form drawing exercise I posted last time - the cone, cube, cylinder and sphere. You don't see lots of confusing little shadows all over, you see big carefully gradated shadows, all of which work together to do their job perfectly - they define form clearly.
Drawing is a process - it's not simply recording exactly what you actually see. The job of the artist is to make things clear and easily understandable, and often due to poor lighting conditions or a bad viewing angle or confusing shadows cast by objects surrounding the model or any number of other problems, what you actually see can be very confusing and not at all pleasing to the eye. This doesn't create a problem for the trained artist. Or I should say he has strategies to help overcome these problems and many more. He can remove confusing shadows or even invent a completely different light source coming from a totally different angle, to clarify the figure. This is because he has learned to understand light, how it works, and how to imitate its various effects on forms, and he also understands the principles of art, which include clarity and simplicity.
He has learned to keep shadows big and simple, because that defines form very clearly and understandably. He has learned to be consistent with which side of the form the shadows are on, even though in reality lighting situations often fail to conform to these rules. He has learned to use contrast, even if it isn't there in reality.
I want to talk some more about that Tintoretto drawing in the last post.
He was an absolute master. I love the drawings of the old masters, even though often their paintings leave me cold. This kind of drawing, done on a toned ground (colored paper) using 3 or 4 values is an ideal way to practice all of these principles, because it helps you to keep things simple. One value for midtones, one for dark shadows, one for lighter shadows, and a highlight added with white chalk (or pink, as it looks like Tintoretto used here). These values conform perfectly to the values demonstrated in the core shadow exercises presented above. Using white paper, which is mostly a modern thing, forces you to either tone most of the image manually or you end up with way too much highlight tone everywhere and your drawing ends up too high keyed. Using chalk or a lighter tone to add highlights assures that you don't overdo them, they should be pretty minimal in most situations. Working on tinted paper like this also helps to understand lighting in color, because the dominant lighting color of the environment will be reflected onto any forms in that environment. If the room is painted blue, or if the sky is blue, then that color will be cast onto everything. But I really want to keep this about drawing rather than painting. The illustrations in Robert Beverly Hale's Master series books are all drawings by the great masters (makes sense, don't it?). So the books are beautiful works of art in their own right, as well as being invaluable artistic guides.
One of the strategies of the great masters is to unify your shadow shapes - keep them big and simple, and run them together like pools of water. In fact shadows are pools - as the light moves or the model moves they flow around it - into the hollows and crevices and gradually change their shape, and they do seem to want to run together whenever possible.
Notice Tintoretto joined almost all the shadows into one big one that remains entirely on one side of the form and defines only those planes facing away from the light. The majority of the drawing is midtone (the blue paper itself), with just little touches of highlight where they effectively push the form out toward the viewer. In the next post I'll discuss planes in more detail - they're a fascinating concept and a great strategy to help organize your drawings. And that's when these posts will really start to come together into a unified system.
Another strategy artists use is to outline the shadows. Map them out. Often they'll start by lightly penciling in the outlines before adding any tone. This allows them to think of the shadows as shapes and to think about the borders of them. If you just start shading without first defining the outlines you can get lost and end up going all over the place, rather than creating a simple and clear map of shadows that defines the form.
Another strategy - divide your values into two distinctly different ranges - one for light and one for shadows. Tintoretto used the paper itself plus pink chalk for light, and 2 values of charcoal for shadow. The lightest value in the shadows should be visibly darker than the darkest value in the light. This helps to avoid confusion and create a visually pleasing map that's easy for the viewer to understand. And as you know if you've ever tried to follow someone's written directions to a place you've never been before - a clear and easily understood map is far better than a confusing one!
All of these strategies are simply ways of thinking about light and shadows - in other words they're ideas. It's what Robert Beverly Hale was talking about when he said drawings are ideas with lines around them.
Ok, that's it for this followup post - next up, we visit the planes!
-
09-18-2013 03:15 AM #86Diamonds And Rust Achievements:
- Join Date
- Dec 2009
- Gender
- Location
- Center of the universe
- Posts
- 6,949
- Likes
- 5848
- DJ Entries
- 172
The Boxed Figure
No, not a collector's action figure still in the original box - though in a sense action figures are close. I'm referring to the figure drawn as a series of boxes and cylinders (or what I like to call tubes and cubes). And again, like the basic form exercises I started this with, we've all seen it a million times. And you probably well understand the main purpose of it - to help solve problems of perspective and foreshortening in figure drawing, so you can draw an arm pointing toward you rather than just held straight down at the figure's side like a soldier standing at attention. Beginners tend to shy away from active poses and foreshortening and instead draw the figure like a flat paper doll, with every part of the body parallel to the picture plane. It's a lot easier. (It's also how I drew Fafhrd, aside from that one arm..
 )
)
Ok, I'll skip over how valuable boxing the figure can be for foreshortening and action poses - I think that's already well understood. Instead I want to discuss some of the more subtle and less well-known reasons for doing it.
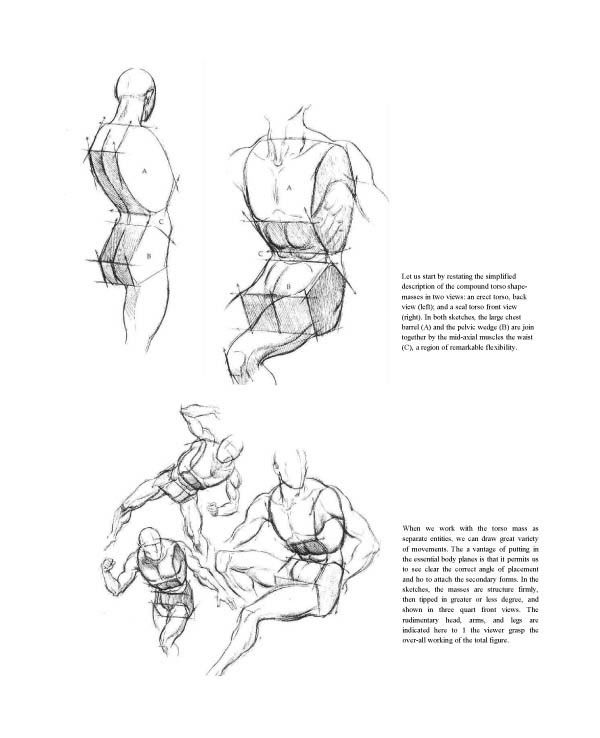
Here's a page from Hogarth's Dynamic Figure Drawing. You can clearly see how he's conceived of the rib cage and pelvis as block shapes, though not just simple rectangular ones. But notice something else - the way the shadows remain contained in the planes of the boxes. The usefulness of 'boxing up the figure' goes well beyond its most obvious virtues. It's another strategy to help you place shadows, to help keep them under control for maximum simplicity and clarity. There are light planes and dark planes. And the fact that there's already a definite line showing where those planes meet is immensely helpful for placing shadows.
Because the human body does consist of planes - many of its parts do anyway (all of them if you want to slightly labor the point). They're not perfectly flat planes that meet at sharp, straight corners like a block of wood - they're gently curved - more so in some places than others, and the corners are rounded. Like a slightly used bar of soap, or like a wooden block that's been taken to the belt sander. Or like the body panels of cars.
Like a wood carver, an artist begins with simple blocks. To carve a puppet head for instance, Pappa Gepetto might select a piece of 4x4 and pencil in outlines on the front, the side and the top, showing him where to carve wood away to get a really rough blocky pseudo-head shape, which is very close to the actual finished shape of the head, but is defined entirely at this point by planes, which he will then file and sand down to make smooth curves where appropriate.

Here you see Hogarth's version of a head as a block shape, somewhat carved down and smoothed on the metaphorical belt sander to round off the corners nicely. And again, see how easy it is to figure out where the big shadows go.
One of the great strategies artists use to simplify drawing is to shade the big forms first. The big forms of the body are the rib cage, the pelvis, the head and neck, the cylinders of the arms and the legs, and the blocks of the hands (drawn as mitten shapes at first) and feet (wedge blocks). Start to figure out your shadows early, in this blocking stage, and it's pretty easy to get a sense of strong solid form. And this way you don't get confused by lots of little shadows all over, which happens if you think about little details before the big forms. This is another strategy I used in my most recent painting that you can clearly see, and that Tintoretto used as well. All the masters use it.
See, here's the beauty of this, and what really ties it all together into a unified system - you're reducing the body to a few basic forms, and you already know how to shade basic forms, right? We covered that in the first post. BAM!! Full circle. Draw the figure as basic forms, shade them according to the core shadow system (or another one - that's only one approach of many described in great detail in Dynamic Light and Shade) and your figures now have an amazing solidity and sense of realness to them.
In the last post I mentioned that shadows are pools of darkness, and when the figure moves or the light source moves they flow around it and into the valleys and hollows. Knowing where the major plane breaks of the body are really helps you to understand exactly were to place these valleys and hollows. Hogarth and Hale both go into great detail about these plane breaks, and their importance to artists. I'm only presenting a quick overview here, in hopes that it will spur some of you to get the books and start to fill your head will these amazing ideas, which will transform your art.
As I already mentioned, these books (aside from How to Draw Comics the Marvel Way) are advanced instruction manuals for the serious art student, and as such they can be pretty dense and take some real slogging to get through. What worked for me was to do an initial read-through of each of them, in which many of the ideas went way over my head. But now I had seen the words and the concepts, was somewhat introduced to them anyway, and a few months later I went back and started going through again, taking it slower this time, going a chapter at a time, and this time I found it making a lot more sense. A lot of the ideas that were brand new and completely alien to me the first time were somewhat familiar now because I had read them before. I've re-read all of them several times now and done many drawings to practice the concepts (not nearly as many as I should - more in the arena of dozens rather than hundreds, but still it has greatly improved my work).
Well, I think I've covered pretty much all I wanted to with these posts. One more thing I want to mention, and this is for the really serious art students (and those who can afford it) - some of the most useful artistic aids I own are a skeleton, a skull, and an ecorche figure (a statue of the body with no skin on it, showing the muscles clearly). The skeleton is the body, and the body is the skeleton, at least in structural terms. Remove the bones, and all you've got is a pile of shapeless muscles in a sack of skin. Learning the forms of the bones is actually more important than the muscles. In fact, Hale describes the life of a young art apprentice in Renaissance days - one of the first things the master would do is throw him a bone and tell him to draw it. Literally, every artist had a collection of bones and would draw them from every angle, learning all the surfaces and forms - they all give shape to the surface of the body - the muscles follow he curvature of bones. Today we can buy somewhat inexpensive plastic replica skeletons and skulls - there are even specialty bone houses you can find online that sell castings of individual bones if you want to get really serious about it.
I got the ecorche (or simply anatomy statue) from the Anatomy Tools website - it's not cheap, but they also have smaller ones I believe that are more affordable. I've found it to be invaluable for checking exactly how muscles overlap in certain parts of the body like the underarm area, and for checking details like which rib the base of the pectoral muscles sits along, etc. You can remove the arms and the head and hold them at whatever angle you need to see how various parts of the body look at unusual angles or with specific lighting. It really supercharges the process. The ecorche (eh-core-shay) is an extravagance that I have wanted for a long time - it was Hale who really made me want that and the skeleton and the skull, and it took me many years before I could afford to get one (the skeleton and skull weren't so bad).
Ok, guess I'll wrap this up here then. Oh, though I should mention, there's now a more modern alternative to the ecorche in the form of software like Poser. It actually lets you define things like how big and muscular you want the figure, and where the lighting is. If you check the Anatomy Tools website they may have their own program for this, I'm not sure.
Alrighty then, DM out!
-
09-20-2013 10:36 AM #87
Damn...you have some nice art! Good to see another artist on here!
Darkmatters likes this.Summon a DC [X] | Talk directly to my subconscious [] | Learn to use a magic staff (energy beam) [] | Teleport [] | FUS ROH DAH [] | Play background music [] | Shoot fire [] | Revisit a previous dream []
-
09-20-2013 04:59 PM #88
Bravooo maestro!!!!
 Darkmatters likes this.
-
09-21-2013 12:10 AM #89Diamonds And Rust Achievements:
- Join Date
- Dec 2009
- Gender
- Location
- Center of the universe
- Posts
- 6,949
- Likes
- 5848
- DJ Entries
- 172
Hey thanks guys! It's great to hear from you!
-
09-30-2013 08:23 AM #90Diamonds And Rust Achievements:
- Join Date
- Dec 2009
- Gender
- Location
- Center of the universe
- Posts
- 6,949
- Likes
- 5848
- DJ Entries
- 172
Spearpoint Diplomacy
Still one day left on my self-imposed deadline, but I think it's done:
-
10-01-2013 09:22 AM #91Diamonds And Rust Achievements:
- Join Date
- Dec 2009
- Gender
- Location
- Center of the universe
- Posts
- 6,949
- Likes
- 5848
- DJ Entries
- 172
Spearpoint Diplomacy
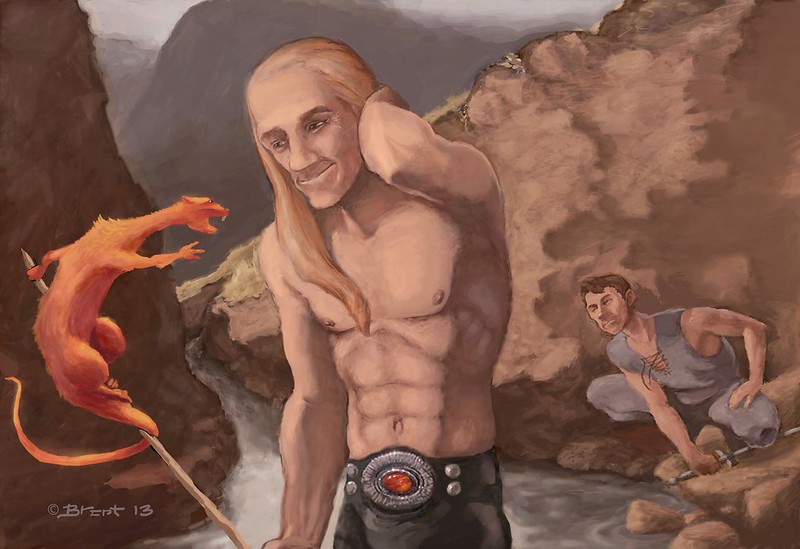
Spearpoint Diplomacy Adjusted by Darkmatters, on Flickr
A slight revision of the previous version - all I did was lighten it up a bit and boost the color slightly plus a few little touches here and there - all in the landscape. Photoshop really likes to darken things up when you export an image! Through this link you can see it full sized* - I think that's how it really shines. Ya gotta see the brushstrokes to get the full effect.
* Once on Flickr page, click on the three little dots down in the right hand corner, then on View All Sizes. You can download the original size if you want.
-
10-02-2013 12:31 PM #92Diamonds And Rust Achievements:
- Join Date
- Dec 2009
- Gender
- Location
- Center of the universe
- Posts
- 6,949
- Likes
- 5848
- DJ Entries
- 172
Carlos - tonight's painting exercise
It's so good to finally be done with that massive project that took up 7 months of my life!! Now I intend to do a bunch of quick exercises. This was totally freeform, starting from a really loose rough tablet sketch. An important thing I learned (too late) on the last project - the color picker will only give you pure colors (plus greyed versions of them). So I started the painting by picking a bunch of pure colors and blending them at around 50% opacity right on the canvas, then I picked from the mixtures. Worked mostly with really big hard brushes at near 100% opacity.
-
10-04-2013 12:28 PM #93Diamonds And Rust Achievements:
- Join Date
- Dec 2009
- Gender
- Location
- Center of the universe
- Posts
- 6,949
- Likes
- 5848
- DJ Entries
- 172
The Waiting
-
10-04-2013 03:13 PM #94Diamonds And Rust Achievements:
- Join Date
- Dec 2009
- Gender
- Location
- Center of the universe
- Posts
- 6,949
- Likes
- 5848
- DJ Entries
- 172
-
10-05-2013 03:56 AM #95Diamonds And Rust Achievements:
- Join Date
- Dec 2009
- Gender
- Location
- Center of the universe
- Posts
- 6,949
- Likes
- 5848
- DJ Entries
- 172
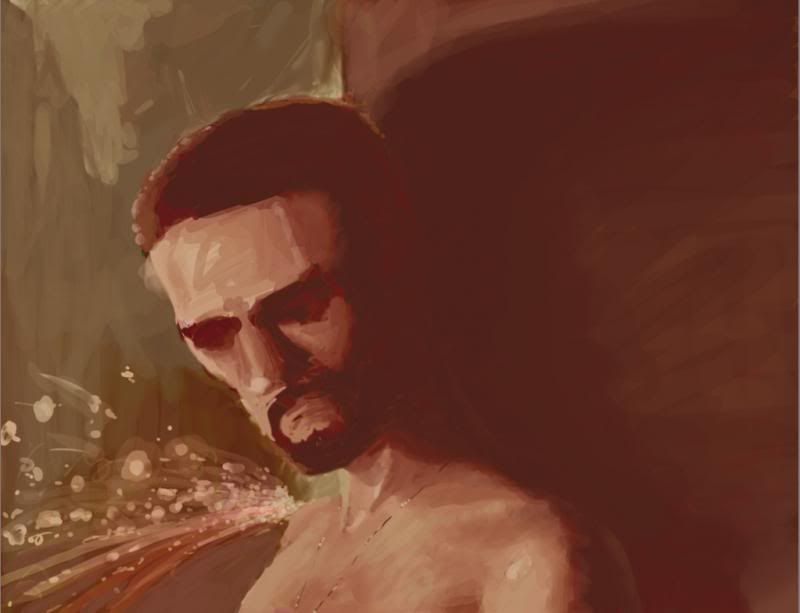
The Waiting

Not completely happy with it (especially the shadow under the head across the shoulder), but that's enough time on this one. I learned a LOT - mostly about painting flesh and using colors. This was done primarily with a burnt sienna for shadows and a pale green for light, to maintain the warm/cool bias.
-
10-05-2013 04:10 PM #96Diamonds And Rust Achievements:
- Join Date
- Dec 2009
- Gender
- Location
- Center of the universe
- Posts
- 6,949
- Likes
- 5848
- DJ Entries
- 172
New exercise - working from reference now

It's been a long time since I drew directly from a photo -- I was super stressed at first, but decided to quarter off the image and just block in. Amazed how well it worked..


.. And next I must draw the face. From slightly underneath even.. the stress is back and twice as bad!
-
10-06-2013 03:55 PM #97Diamonds And Rust Achievements:
- Join Date
- Dec 2009
- Gender
- Location
- Center of the universe
- Posts
- 6,949
- Likes
- 5848
- DJ Entries
- 172
-
10-07-2013 08:12 AM #98Diamonds And Rust Achievements:
- Join Date
- Dec 2009
- Gender
- Location
- Center of the universe
- Posts
- 6,949
- Likes
- 5848
- DJ Entries
- 172

Notes --
I love this way of working from reference - block in roughly and then keep carefully measuring and refining as you go. I used dividers right up against the monitor for comparative measurements, and also held a pencil to get the angles of lines, then slid it over keeping it as close as possible to the same angle.
I'm also finding that highlights look much better painted on ver a midtone rather than left - they end up looking vigorous and energetic rather than flat.
-
10-09-2013 08:45 AM #99Diamonds And Rust Achievements:
- Join Date
- Dec 2009
- Gender
- Location
- Center of the universe
- Posts
- 6,949
- Likes
- 5848
- DJ Entries
- 172
-
10-10-2013 10:33 AM #100Diamonds And Rust Achievements:
- Join Date
- Dec 2009
- Gender
- Location
- Center of the universe
- Posts
- 6,949
- Likes
- 5848
- DJ Entries
- 172
Sketch


I've been using the stylus so much I can actually draw with it now! Didn't think it would ever happen.


Similar Threads
-
Darkmatters' Puppet Theatre
By Darkmatters in forum Artists' CornerReplies: 78Last Post: 04-16-2018, 05:31 PM -
Darkmatters' 1st speedpaint attempt
By Darkmatters in forum Artists' CornerReplies: 22Last Post: 11-23-2011, 12:01 AM -
Welcome to the Team, Darkmatters
By slash112 in forum The LoungeReplies: 55Last Post: 10-16-2011, 03:11 PM
 Posting Permissions
- You may not post new threads
- You may not post replies
- You may not post attachments
- You may not edit your posts
Bookmarks